Are you looking for a way to display your data in a neat and organized manner on your web page? If so, you might be interested in learning how to use Console Table JavaScript. This is a handy tool that allows you to create and manipulate tables in the browser console, which can help you debug, test, and analyze your code.
In this blog post, we will show you:
- Learn how console.table can improve your debugging skills
- Explore the different data types that console.table can handle and display
- Useful tips and tricks to make the most of console.table
- JavaScript console table without index
- Convert your console table data to CSV format for easy exporting
- Common issues with console.table
By the end of this post, you will be able to use console.table() JavaScript method to enhance your web development debugging skills. So, let’s get started!
What is console.table() and why use it?
console.table() is a cool method that lets you see your data in a nice table on the browser’s console. You can use other methods like console.log or console.error to show different kinds of information on the console, but console.table() makes your data look better and easier to understand.You just need to give console.table your data, and it will do the rest. You can also give it a list of properties to show in the table. Your data can be anything like an array, an object, a map, or a set. The method doesn’t return anything, but it prints the table for you.The best part is that you can sort and filter the table by clicking and typing on it. This helps you find what you’re looking for faster, and spot any problems or patterns in your data.How to use console.table in JavaScript?
Want to make your data look neat and clear in the console? Want to debug better? Then you need console.table() in JavaScript. It lets you print data in tables in the console. You can see and compare your data easily, and spot errors or patterns faster. Let’s see how it works!
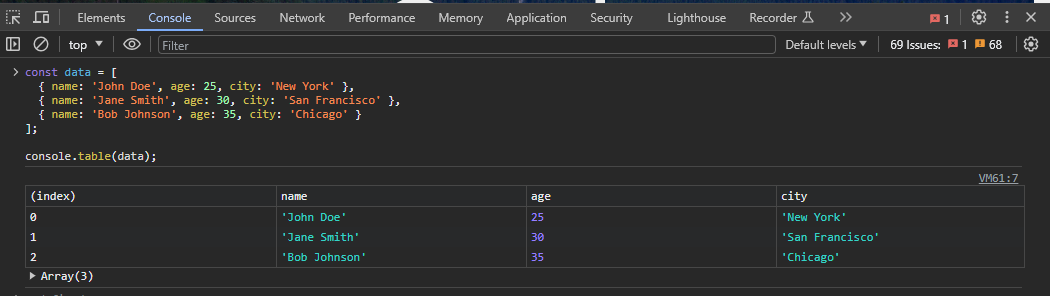
const data = [
  { name: 'John Doe', age: 25, city: 'New York' },
  { name: 'Jane Smith', age: 30, city: 'San Francisco' },
  { name: 'Bob Johnson', age: 35, city: 'Chicago' }
];

console.table(data);
How to use console.table with different types of data?
console.table with different types of data, and explain the output and the behavior of the method.JavaScript console.table() with a simple array
console.table is a handy method that works with different types of arrays. Here’s how:- A simple array gives a table with two columns: index and value.
- An array of arrays gives a table with the first array as headers, and the rest as rows.
- An array of objects gives a table with the object keys as headers, and the object values as rows.
console.table with arrays:// A string array
let colors = ["White", "Black", "Blue"];
console.table([colors]);
// A number array
let numbers = [10, 20, 30];
console.table([numbers])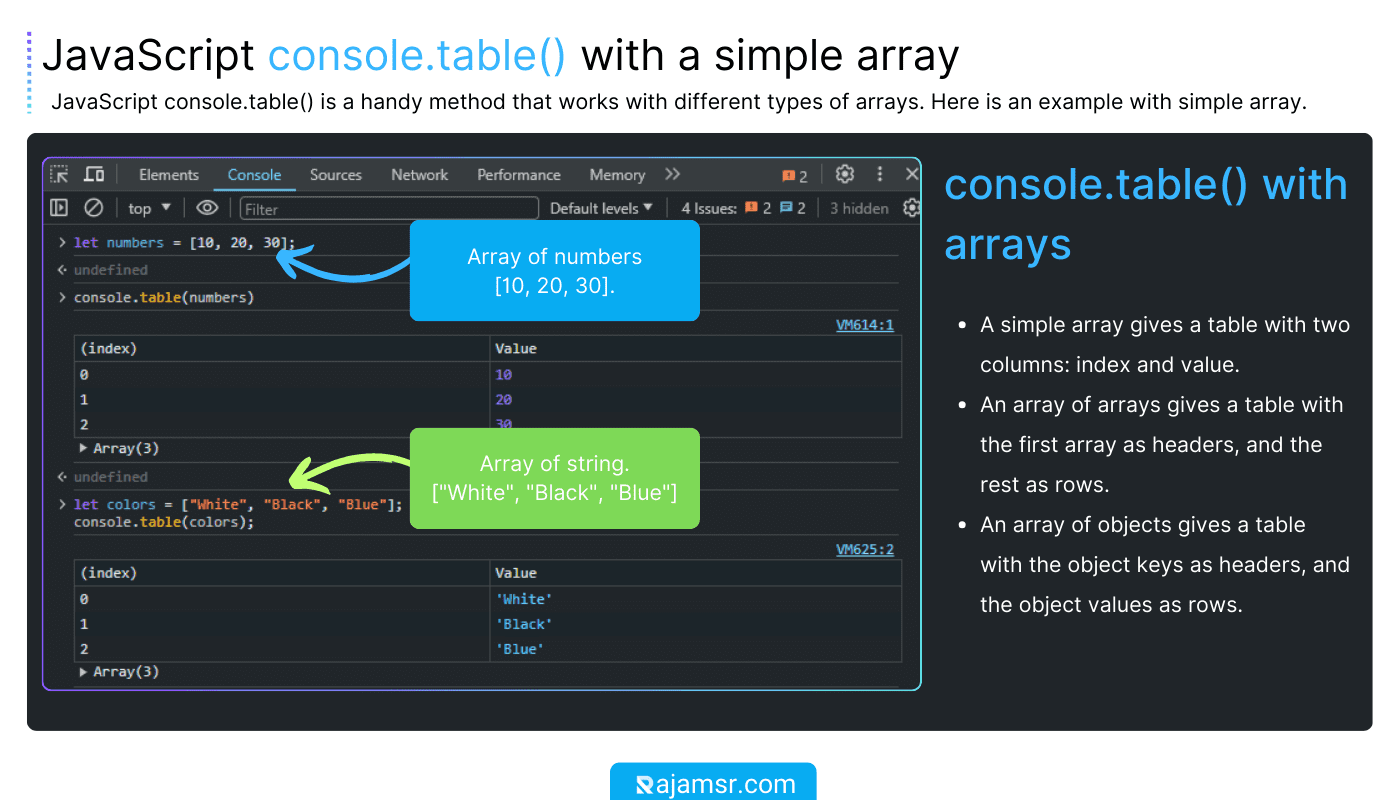
JavaScript console.table() with an array of arrays
An array of arrays gives a table with the first array as headers, and the rest as rows.
// An array of arrays
let matrix = [[1, 2, 3], [4, 5, 6], [7, 8, 9]];
console.table(matrix);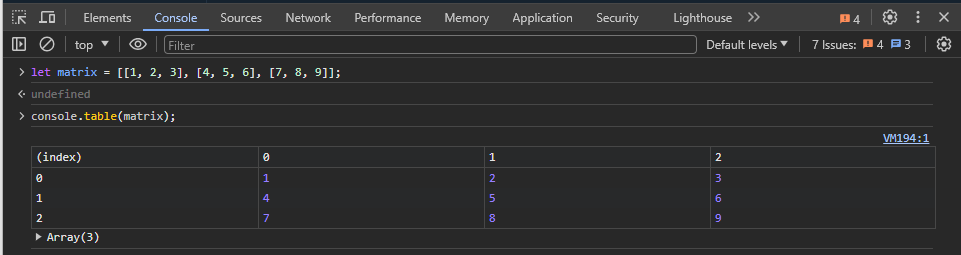
console.table displays the arrays in a neat and consistent way, and allows you to sort and filter the data as you wish.JavaScript Objects with console table
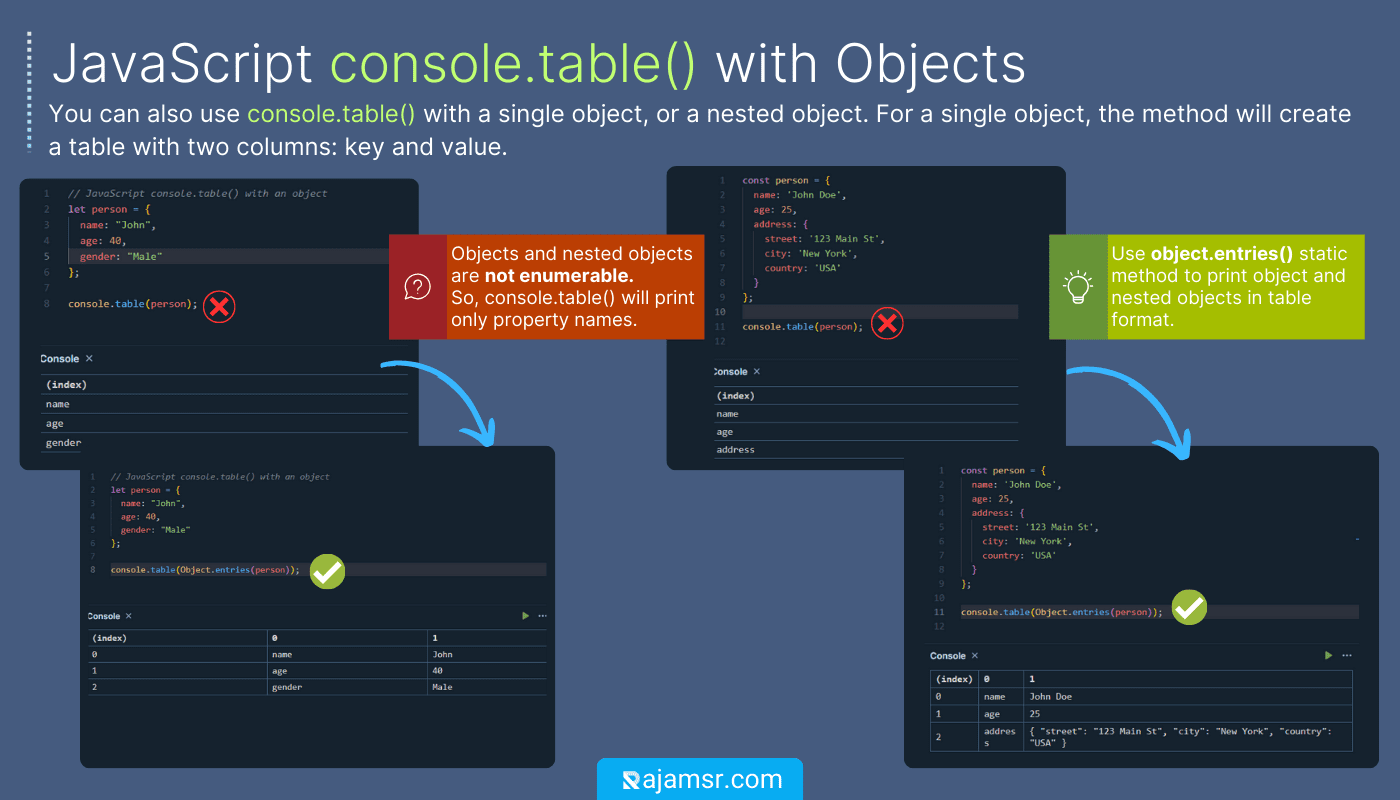
console.table() is a handy method for displaying objects as well. It works with single or nested objects. For a single object, it shows the key and value pairs in two columns.For a nested object, it shows the top-level keys as columns and the nested values as rows. If the nested values are not primitive type, it converts them to strings.Here is the code snippet and screenshot of using console.table with objects:// A person object
const person = {
name: 'John Doe',
age: 25,
gender: "Male"
};
console.table(person);However, this will not print values in tabular format? why? because the object is not enumerable. There is a simple solution! Use static JavaScript Object.entries() method. It will print objects and objects with nested properties in tabular format.
JavaScript console.table() with an array of objects
For array of objects, it shows object key names as columns and values as rows. Here is an example of JavaScript array of objects with console.table() method:
const data = [
  { name: 'John Doe', age: 25, city: 'New York' },
  { name: 'Jane Smith', age: 30, city: 'San Francisco' },
  { name: 'Bob Johnson', age: 35, city: 'Chicago' }
];

console.table(data);
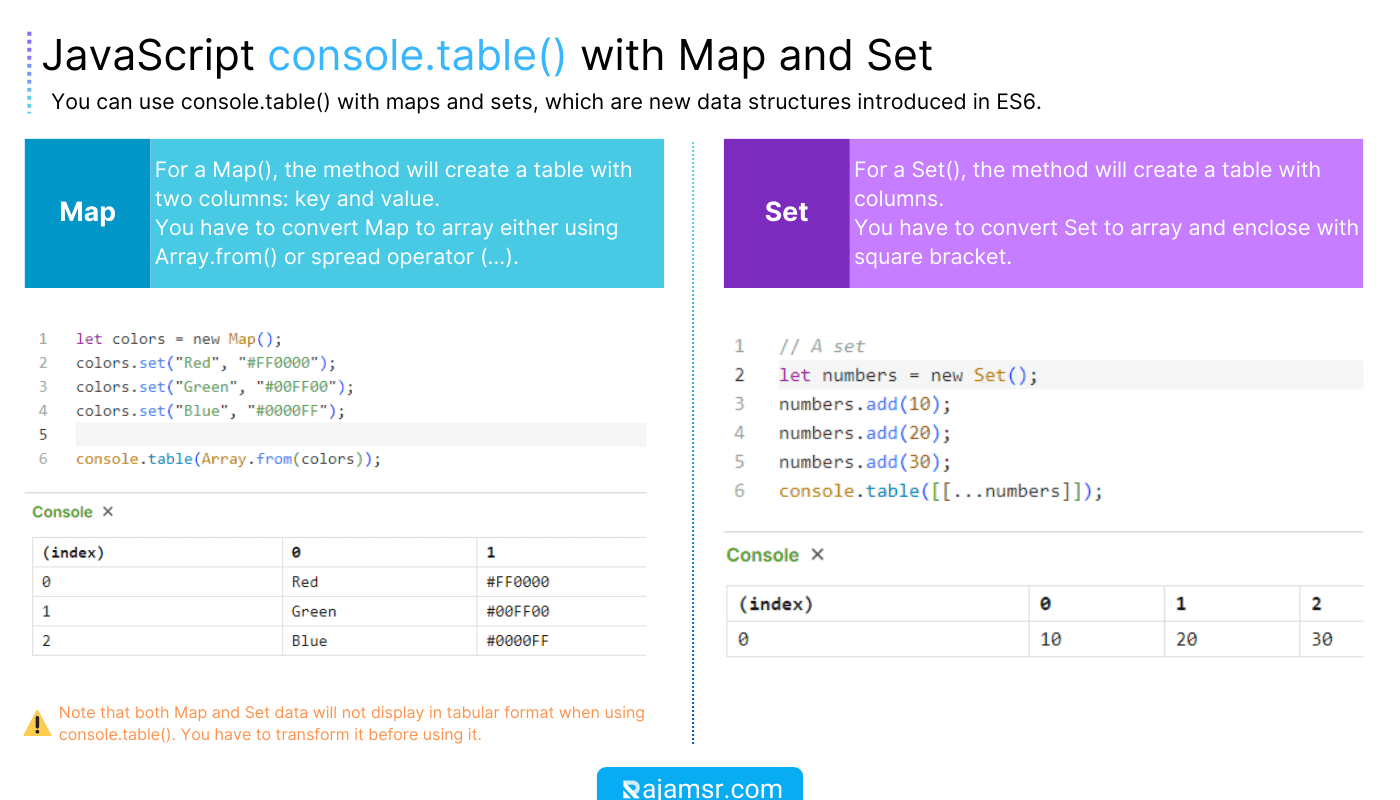
Maps and Sets
You can also use the console.table() with maps and sets, which are new data structures introduced in ES6. A map is a collection of key-value pairs, where the keys and values can be any type of data. A set is a collection of unique values, where the values can be any type of data. Map and Set() are non-primitive data types in JavaScript.
Here is an example of using a console.table with maps and sets:
Tips and tricks for using console.table effectively
console.table effectively, and make your debugging experience more enjoyable and productive.Use the second argument to specify the columns
As I mentioned earlier, console.table takes an optional second argument, which is an array of property names to include in the table. This can be useful when you want to display only certain columns from your data, or when you want to change the order of the columns.
For example, if you have an array of objects, and you only want to show the name and age columns, you can do this:
const data = [
  { name: 'John Doe', age: 25, city: 'New York' },
  { name: 'Jane Smith', age: 30, city: 'San Francisco' },
  { name: 'Bob Johnson', age: 35, city: 'Chicago' }
];

console.table(data, ["name", "age"]);
console.table displays only the name and age columns, and ignores the city column.Use console.group and console.groupEnd to group your tables
Sometimes, you may want to display multiple tables in the console, and group them by a common label. For example, you may want to compare the results of different functions, or the performance of different algorithms. In this case, you can use console.group() and console.groupEnd() to create a group of tables, and give them a descriptive name.
For example, if you want to compare the output of two sorting functions, you can do this:
let numbers = [5, 3, 7, 1, 9, 4, 6, 2, 8];

console.group("Bubble Sort");
console.table(bubbleSort(numbers));
console.groupEnd();

console.group("Quick Sort");
console.table(quickSort(numbers));
console.groupEnd();
console.table() displays the tables in a grouped and collapsible way, and allows you to toggle the visibility of each group.JavaScript console table without index
console.table() function provided by most JavaScript environments does not support omitting the index column. The index column is automatically included in the output when using console.table(), and there isn’t a built-in way to suppress it.const data = [
{ name: 'John Doe', age: 25 },
{ name: 'Jane Smith', age: 30 },
{ name: 'Bob Johnson', age: 35 }
];If you need to display the data in a tabular format without the index column, you might need to implement a custom solution to format the output manually. Here’s an example of how you could achieve this:
// Function to print a custom table without index
function printCustomTable(data) {
  const nameColumnWidth = 30;
  const ageColumnWidth = 10;

  data.forEach(b => {
    let name = b.name.padEnd(nameColumnWidth, ' ');
    let age = b.age.toString().padStart(ageColumnWidth, ' ');

    console.log(`| ${name} | ${age} |`)
    console.log(''.padStart(nameColumnWidth + ageColumnWidth + 7, '-'))
  })
}

// Printing the custom table without index
printCustomTable(data);
To display content at a fixed width, we can use JavaScript padding methods. These methods help us print the data in a tabular format, as the following example shows.
| John Doe                       |         25 |
-----------------------------------------------
| Jane Smith                     |         30 |
-----------------------------------------------
| Bob Johnson                    |         35 |
-----------------------------------------------
JavaScript console table to CSV
Exporting console.table data to a CSV file can be useful for further analysis or sharing data with others. While console.table doesn’t have a built-in CSV export feature, you can utilize JavaScript and libraries like Papaparse or CSV Download to achieve this.
Here’s a step-by-step guide:
- Prepare your data: Ensure your data is in an array of objects format, similar to what console.table accepts.
- Include the library: Integrate Papaparse or CSV Download into your JavaScript code by importing or including the necessary scripts.
- Convert and download: Utilize the library’s CSV conversion functions to convert your data and generate a download link for the CSV file.
Why isn't console.table working?
If console.table is not working as expected, several factors could be causing the issue. Here are a few common reasons and troubleshooting tips:
- Compatibility issues: Ensure that your browser and JavaScript environment support
console.table. Older browsers or non-standard environments may lack this functionality. - Incorrect usage or parameters: Double-check that you’re using
console.tablecorrectly, passing the appropriate data structure as an argument. - Browser-specific limitations: Some browsers may impose limitations on the number of rows or columns that can be displayed using
console.table. Consider using alternative approaches or tools for large datasets.
Frequently asked questions
console.table like this:
const data = [
  { name: "John", age: 30 },
  { name: "Jane", age: 25 },
  { name: "Bob", age: 40 }
];
console.table(data);
const data = [
    { name: "John", age: 30 },
    { name: "Jane", age: 25 },
    { name: "Bob", age: 40 }
];
console.log(data.map(obj => Object.values(obj)
  .join(","))
  .join("\n"));
/* Output:
John,30
Jane,25
Bob,40
*/
const jsonData = [
    { name: "John", age: 30 },
    { name: "Jane", age: 25 },
    { name: "Bob", age: 40 }
];
const table = document.createElement("table");
jsonData.forEach(obj => {
    const row = table.insertRow();
    for (const key in obj) {
        const cell = row.insertCell();
        cell.innerHTML = obj[key];
    }
});
document.body.appendChild(table);
Conclusion
In conclusion, we explored what console.table() is, how to use it effectively, and various tips and techniques to enhance your debugging and data visualization workflow.
By harnessing the power of console.table(), you can easily analyze and display complex data structures in an intuitive and organized manner. Whether you need to inspect arrays, objects, or nested data, console.table() the method can help you do it like a pro.
To download console table data as CVS, you have to use a third-party library.

